- CSPro Getting Started Guide
- Introduction
- Installation
- CSPro Tutorial
- About the Tutorial
- Exercise 1: Create a Data Entry Application
- Exercise 2: Create the Data Dictionary
- Exercise 3: Create the Data Entry Forms
- Exercise 4: Enter Data
- Exercise 5: Tabulate Data
- Exercise 6: Modify the Table
- Exercise 7: Add Edits to the Data Entry Application
- Exercise 8: Run a Batch Application
Step 3: Generate Forms Automatically
(Exercise 3, Create the Data Entry Forms)
CSPro allows you to generate a complete set of forms, which include all the items in the data dictionary, in one operation. We will use this feature now in order to save time.
- Select Edit -> Generate Forms from the main menu, or press Ctrl+G.
- CSPro will warn you that the forms you made in steps 1 and 2 will be replaced. Click on Yes to continue.
- The Drag Options dialog box will appear. Make sure the Roster Options has Horizontal selected. Click on OK to close the Drag Options dialog box.
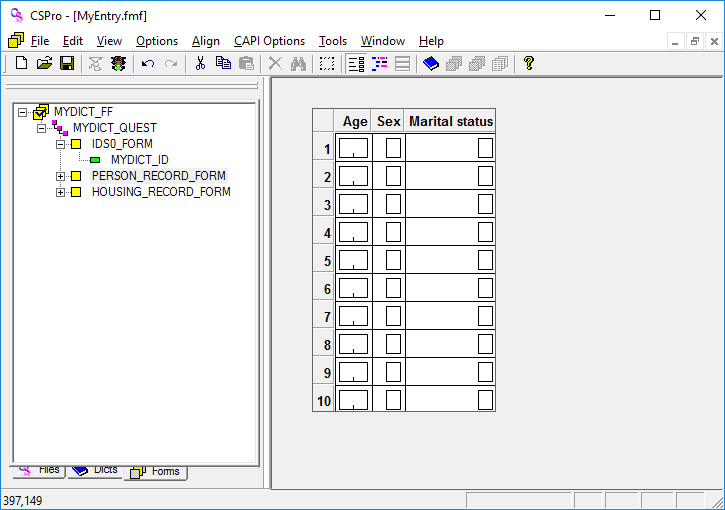
- Note that the tree on the left shows that you now have three forms. Open up the entire tree by clicking the + next to any part of the tree.
- Click on PERSON_RECORD_FORM on the tree. You will see the roster that CSPro created for you.
- Click around on the tree on the left as you like to explore the forms that CSPro created.
- Save the work you have done so far. Select File -> Save from the main menu, or click
 on the toolbar.
When you have completed this step the screen should look something like:
This completes this exercise. Continue to the next exercise: Step 1: Run the Data Entry Application.