- <GetStart>
- CSPro User's Guide
- The CSPro System
- Data Dictionary Module
- The CSPro Language
- Data Entry Module
- Batch Editing Applications
- Tabulation Applications
- Data Sources
- Synchronization
- CSPro Statements and Functions
- Text Templates
- Templated Reporting System
- HTML, Markdown, and JavaScript Integration
- Action Invoker
- Appendix
- <CSEntry>
- <CSBatch>
- <CSTab>
- <DataManager>
- <TextView>
- <TblView>
- <CSFreq>
- <CSDeploy>
- <CSPack>
- <CSDiff>
- <CSConcat>
- <Excel2CSPro>
- <CSExport>
- <CSIndex>
- <CSReFmt>
- <CSSort>
- <ParadataConcat>
- <ParadataViewer>
- <CSCode>
- <CSDocument>
- <CSView>
- <CSWeb>
Android Navigation
Overview
The CSEntry for Android application is designed to be straightforward to use, with features and options that interviewers can easily control.
Entry Applications Screen Upon opening CSEntry, all data entry applications on the device are displayed. Click on an application to open it. | 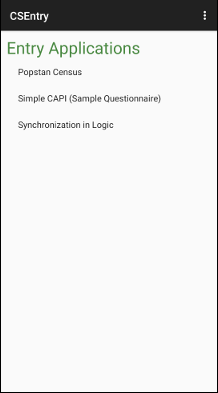 |
Case Listing Screen The case listing displays all cases that have already been added to the data file. Clicking on a case will open it for modification. Clicking on the add icon (green circle with a plus), will add a new case. To delete a case, hard-press on the case until a deletion menu appears. The menu on this screen has options to sort the cases alphabetically, or to display only incomplete cases. |  |
Screen Elements This illustration showcases the features of the data entry screen.
|  |
User Inputs: Text Box To enter data in a text box field, simply type the response using the keyboard. If a keyboard does not appear automatically, click on the field and a keyboard will appear. If your keyboard has a Next key, you can click on it to move to the next field. | 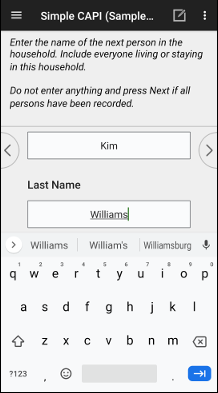 |
User Inputs: Radio Buttons When presented with a list of radio buttons, you must select one, and only one, response. Click on the response label, or the corresponding radio button, to make your selection. |  |
User Inputs: Check Boxes When shown checkboxes, you can select none, one, or multiple responses. Click on the response label, or the corresponding checkbox, to make a selection. Once you are finished making all selections, you can proceed to the next field. |  |
User Inputs: Combo Box With a combo box, you can either enter a value within the defined range (as in a text box field), or choose a discrete value (as with radio buttons). To bring up the discrete values, click on the button to the right of the text field. |  |
Search Filter After clicking on the search icon, a field will appear where you can type a search query. The list of responses will automatically filter based on your search query. The full text of each response is searched, not necessarily starting from the first letter of the response. |  |
Field Notes After clicking on the pencil and paper icon, you will have the opportunity to type a field-specific note. Click the icon again to close the note. |  |
Case Tree Clicking on the menu icon brings up the case tree. The case tree displays all fields that have been entered in the data entry application, showing the field label as well as the field response. If you click on a field, you will be taken to that field. This allows you to quickly move from one part of the questionnaire to another. To insert or delete a repeating occurrence, hard-press on the occurrence label until you are presented with a menu that allows for insertions and deletions. You can dismiss the case tree by using the Android back button. |  |